| 1. |
Use
the "hole marking template" to mark
the locations of 4 holes on the wall. |
| 2. |
At
each marked location drill a hole that is
10mm in diameter and 7cm deep. |
| 3. |
In
each hole install the supplied special wall
mounting screw. |
| a. |
Insert
the screw in the hole. Leave the nut and the
treaded portion of the screw outside the hole. |
| b. |
Take
off the nut from the screw. |
| c. |
Hit
the needle so that it goes completely inside
the screw. |
| d. |
The wall mounting screw should now be firmly
fixed to the wall. |
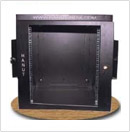
| 4. |
Hang
the Hanut 2@1 wall mount cabinet on the 4-screws.
Put the nuts back on the screws and tighten
to secure the wall mount cabinet. |
| |
The
wall mount cabinet should now be ready for
use. |